Friday, January 1, 2016

Sous Vide Cooking

In my kitchen, the laws of the universe are fixed.  There's no way around it, some cuts of meats take longer cooking time to become tender and delicious.    Leg of duck, beef short ribs, or a chicken thighs take a while to cook.  Certainly longer than what time normally elapses between when a restaurant waiter takes my order and he serves it to me.   10-20 minutes isn't enough time enough time breakdown the fibers and make it tender.

Since the same laws of physics apply in a chef's kitchen as my own, they must be cooking these things in advance.  But how are they keeping the meats from drying out when reheating?  Leftovers are rarely as good as fresh cooked foods...they're doing something different.

In my quest to make better foods, I've learned overcooking can be your worst enemy.  Brining can help, but still there's no substitute for awareness of the temperature (and time) you're cooking things.  If you put science (and technology) in your corner, you'll see years of experience are no longer necessary to achieve an end result that's both predictable and repeatable.

Three hours for this confit of chicken leg,
thigh, and wing (duck fat).
Perfectly done
Years ago I learned of a cooking technique called sous vide.  In a nutshell, you place food in a sealed plastic bag (or glass jar), in water that's the same temperature as you want to finish it.  For example, if you want a medium rare steak, you set the water temperature for 130 degrees.  Eventually the food becomes the same temperature as the water.  This is known scientifically as a thermal equilibrium.  No matter how long you leave the food in the water, it will not get hotter than the water temperature.

For years, sous vide systems (and hot water circulators) cost a lot of money...more than I wanted to spend.  For Christmas this year I asked for and received a sous vide for $99 that could easily be mistaken for a stick blender.  It brings water to the desired temperature and circulates it.  You can use a cooler, large pot, kitchen sink, or even a five gallon bucket to cook your food.


Chicken, pork belly, and duck ready for the hot water bath
Once you season and seal your food in a ziptop bag or vacuum seal it, just drop it in the water and it will reach the exact temperature of the surrounding water.  It's that easy.  Chicken, you like it nice and juicy at 160?  Steak, 135 for medium all the way through?  Pork tenderloin, you like it slightly pink at 145...done!  And confit...don't get me started, that's another post...

Pork belly, chicken and duck thighs
all sealed in separate bags,
cooked together for different lengths of time.
So it's perfect...right!  Hold on a moment, this steak looks kinda gray.  At the restaurants, steaks are brown (Maillard).  The only catch to cooking foods to a perfect finished temperatures through sous vide is you will never have the browning/sear we all love.  This necessitates browning in a skillet or use of a kitchen torch to finish the dish.  So fire up your cast iron, aluminum clad, or carbon steel skillet with a bit of high temperature oil (NOT EVOO!!) just like they do in fine restaurants to finish their sous vide dishes.  Golden brown and delicious!

A word of caution: while some meats benefit from extended time in the sous vide (tough cuts) other meats will lose their desired texture if left floating around too long.  Fish, poultry, and tender cuts of beef and pork should only be kept at their finish temperatures for a length of time appropriate to achieve the desired tenderness.  No one likes mushy meat.  Experiment, but keep this in mind.  The more delicate the meat, the more you have to pay attention to this.  As a general reference:

Fish - 1-2 hours (135F)
Chicken - 4 hours or less (160F)
Tough cuts: - 12 - 24 hours or more (Short ribs, pork belly) (165F)

The best part about sous vide is you can do a lot of cooking in advance, keep it in your refrigerator, and brown it when you're ready to eat...it's already cooked perfectly.  It took very little work to have duck (leg and wing), chicken (leg, thigh, wing), and pork belly ready for meals all next week.  I already browned up a bit of the pork belly and enjoyed with with boursin polenta...as good as you'd get anywhere and they'd charge you $25...  And do you want a glass of wine with it?  After tax and tip, you better have a $50 bill in your wallet.  Table for two?  $5 for two of these at home.

Pork Belly with Boursin Polenta
It's hard to mess up using sous vide.  The science and technology make it easy to get it right everytime.  The taster cuts of meat which were once difficult to cook are now simple.  Use a brine and sous vide together and you'll have food as good or better than you've had anywhere.

Bon appetit!


Wednesday, December 30, 2015

Cheesecake - The Ultimate Dessert


Very few of us know when our last meal will happen.  In fact, unless you have "a date with the state," that day will be a mystery.  But if you knew, what would you have as your last meal?  Me, I might skip the meal all together and have the single most decadent food ever created: Cheesecake

14" wide by 3" tall cheesecake (from heaven)
No other dessert is even close.  The combination of thick luxurious creams, tang, and pleasant sweetness has no rival.  Ice Cream you say?  Nope.  Cake, pie, creme brulee?  Nope, nope, nope!  All other desserts play in the triple A league at best.  A great cheesecake is hall of fame material.

I venture to say there are a lot of people who've never had a good one and thus don't understand my obsession.  Finding a good cheesecake (I mean a really good one) is difficult; at least where I live.  Chances are, you have to take matters into your own hands if you want the real deal.  Below you'll find detailed instructions how to make the best cheesecake of your life.

Determining the proper pan is the first step.  Spring form pans have the advantage of being able to get the cake out easily after baking.  The disadvantage is it's not water tight.  To make a great cheesecake we need to use a water bath (submerge the pan in a large pan filled with hot water, 2/3rds of the way).  This allows for consistent heating and provides a humid environment which prevents the top from cracking.  I've used spring form pans with aluminum foil (as a waterproof barrier) wrapped tightly around it successfully a few time...but have had just as many failures.  If there's a way, water will find it and soak what was supposed to be a crisp graham cracker crust.  My choice is a round cake pan.  Getting the cake out is not as simple as a spring form, but the risk of water infiltration is eliminated.

I've used straight wall pots as well.  These work fine, but it can be a challenge to get it out of the pan sometimes.  A square or rectangular cake pan works well also.  Even a bread loaf pan will work.

This recipe is for a 9 x 2.5 inch cheesecake.  The size can be scaled up or down to fit the pan size you're using.  I recommend you make enough batter to have a cake that's at least 2 inches thick.  Baking times will change as the volume of the cake changes...longer time for more volume, shorter for less.
  • 1 stick of butter (melted)
  • 10 full graham crackers (4 rectangles per full cracker)
  • 1 cup of sugar
  • 2.5 packages of cream cheese
  • 1.5 cups of sour cream
  • 1 tbsp vanilla
  • 2 eggs
  • 3 egg yokes
  • 1/3 cup of heavy cream
Start by lining the pan with parchment paper.  Lay out a sheet of parchment and trace around it with a pen.  Cut out the circle.  Then cut strips of parchment three inches wide and long enough to go all the way around the pan.  With a brush apply enough melted butter to the inside and bottom of the pan to adhere the parchement.  Then stick the parchment in place.  Take care to make it lay as flush and even as possible on both the side and bottom...the better job you do on the sides, the nicer your cheesecake will look when you're done.
Tracing the circle

Now smash up the graham crackers.  The size of the bits should range between a crumb and a quarter.  I do this in a plastic ziptop bag.  Mix the remaining butter with the crackers, making sure it's evenly distributed.
Pour all but a half a cup of the graham crackers into the pan, on top of the parchment.

Use something flat and round (like the bottom of a glass) to push the graham crackers into a smooth flat crust.  Take care not to have any crumbs on the side walls...they don't look so good on the outside edge of the finish cheesecake.  
Using a water glass to smooth out the graham crackers
Crust is packed in nicely
Now blind bake the crust at 350 degree for 15-20 minutes...or until it starts to turn a bit darker than it already is.  When it's done, extract from the oven and let it come to room temperature, then place it in the refrigerator to cool even more.
Blind baking, extra crumbs on the right to use later


Set your oven at 250F.  Place the cheesecake pan inside a pan large and tall enough to allow you to hold water 2/3rds of the way up the outside of the cheesecake pan.  A roasting pan is fine; as is another baking pan if you have it.  A baking sheet with tall edges might work, but make sure it can hold water at least halfway up the cheesecake pan.  Pour enough hot water in to do the job, but not so much that it overflows the pan when the cheesecake pan goes in.  Close the door and let the water heat up.

The batter.  It's a lot of work to get a smooth batter without an electric mixer.   Someone could do it with a hand whisk and skip a trip to the gym that day.  A stand mixer makes it easy as long as you add ingredients in the right order.  Use the paddle attachment, not the whisk. Smooth is the key.  To do get it completely smooth, bring all the ingredients to room temperature first.  

In goes the cream cheese
First add the sour cream and cream cheese.  Turn on the mixer and let it run until they are completely combined and perfectly smooth.  Scrap down the bowl several times to make sure everything is fully incorporated.  It's very hard to get a smooth cheesecake if you don't do this first...trust me on this one.  The mix should look something like cake icing when it's fully blended.


From here, add the rest of the ingredients one at a time (sugar first, cream last) and mix until everything is fully blended. 
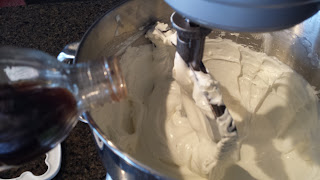
Vanilla Extract.  Yes, I eyeballed it
That yoke is on the edge of the millennium force
Heavy Cream
Scrap down the bowl at least once at the end and mix again to make sure everything is evenly incorporated.

The owner of the number one bakery in the country told me if you don't let the crust fully cool, it's more likely the bits will float up into the cheesecake while it's baking...not what we want.  Carefully pour in the batter.


Take a few moments and agitate the pan to force air bubbles to the surface.  Use a paring knife to pop as many of the bubbles as you can.  It's very important to get the large bubbles out or you may have a less than perfect surface to your cheesecake.

Slowly and carefully lower your soon to be cheesecake into the water bath.  Take care not to splash water into the cheesecake.  If there's too much water, scoop some out with a coffee mug.  If you need more, pour hot water in to bring the water level where it needs to be.

Settled into the water bath
Close the oven door and wait...  After an hour check the cheesecake.  If it looks slightly

Looks puffy in the middle
fluffy/puffy in the middle, you're done.  If you tap the pan and everything moves like jello, it needs more time.  Give it another 15 minutes and check it again.  Or to make sure you have it right, use an instant read thermometer and stick it right in the center halfway down.  When it registers 158, you're done.  Remember how long it took to get this temperature and next time you won't have to cause a blemish in the top of your perfect cheesecake.


After it's done, take the cheesecake out of the oven.  Careful not to splash water into the cheesecake.  First let it come to room temperature, then place it in the refrigerator overnight (minimum of 6 hours).

The next day fill up your water bath again with hot water from the faucet.  Then cut a piece of parchment paper (or wax) slightly larger than the diameter of your cheesecake.  Float the cheesecake in the water bath for 30 seconds to slightly melt the edges.  Place the parchment/wax paper on top of your cheesecake.  Then put a flat cutting board on it and carefully flip the cheesecake.  If it doesn't come out, use a paring knife and carefully go around the outside edge...do your best not to mess up the edge.  Go back into the hot water bath again and repeat the flipping process.

Once the cheesecake is out of the pan, carefully peel off all the parchment paper.  Now determine what you want your cheesecake's final resting place to be.  I use a round cutting board (see the picture above/below).  Put the board on the crust side of the cheesecake and flip it again.  Now carefully peel the parchment/wax paper off the top.

The reserved graham cracker crumbs are to fix mistakes/imperfections.  If the sides don't look right, pack an even layers of crumbs all the way around the outside edge.  If you used a thermometer


on the top or if it was damaged in the flipping, sprinkle the fine bits on until it's not longer noticeable.

That's it.  Don't let the long details of these instructions intimidate you.  It's not hard.


I'm a purist and have never experimented with raspberries, chocolate, strawberries and whip cream additions.  Cheesecake this good doesn't need it.

Enjoy!

Tuesday, December 29, 2015

Guacamole


Tortilla chips and guacamole...  Delicious.  I've had good guacamole in many places, but like it better at home where I can customize it to my palate.  It's really very simple to make and as good or better than anything you'll buy elsewhere including the stuff that's made in front of you.  A bag of corn chips and homemade guacamole is just about as easy as it gets for something to take to a party and still look like you put in some effort.

The fresher the better because avocados tend to get brown quickly.  The lime juice helps combat this, but it only delays the inevitable.  Make it no more than a couple hours before you want to use and press plastic wrap against the surface forcing out as much air as possible to prevent oxygen contact.

My favorite guacamole:

  • 2 Large Avocados
  • 1/3 tsp Salt
  • 1/4 tsp Black Pepper
  • 1/4 tsp Cumin
  • 1 Small Garlic Clove, minced very fine
  • Juice From Half A Lime

Use a knife to cut all the way around the avocados.  Cut all the way to the pit and do your best to end the cut in the same line you started.  Twist the avocado and it should pull into two halves.  Now dig out the pit, discard (or grow a tree).


Scoup out the fruit and place it in a bowl.
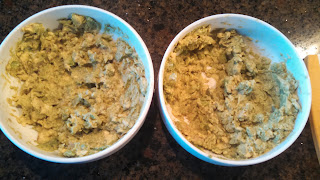
Two bowls because I'm doing two different recipes

Squeeze lime juice, pour it in, and sprinkle in the cumin, salt, and pepper.  Add the minced garlic.   Use a fork or potato masher to work it into the consistency you like.  I prefer mine a bit chunky, but if you want it smooth, just keep working it till it's there.


If you like tomatoes, add some.  Want some kick, dice up a jalapeno and leave as much of the rib in as you like (discard the seeds, the ribs are where the heat is).  Cilantro?   Sure, if you enjoy it.  The point is you can have it your way.  Make it how you like it and you'll like it better than the stuff you get at a Mexican Restaurant.

Enjoy it chilled or at room temperature.


Friday, December 18, 2015

Homemade Pancetta -


Ten years ago when I first wanted to try to make my own bacon, pork belly wasn't available at any of my local grocery stores.  If I wanted it, I would have had to order it from a specialty meat house.  These days it's everywhere.  Costco has 7-10 pound slabs in the meat section.  Regional grocery stores sell it in smaller packaging.

It's become a very popular cut of meat at restaurants as well.  In fact, I recently enjoyed a fantastic pork belly confit with boursin polenta at a local restaurant and replicated it at home...but that's another blog post.  This post is about taking the first steps to making cured meats.

Pancetta is a true delicacy.  There are countless applications to use it.  The addition of pancetta to any dish adds a layer of flavor that can turn ordinary food into something spectacular.  Using it is easy; finding it and paying for it are not!  Half my local grocery stores don't carry it, except in prepackaged slices next to the "so and so has a way with b-o-l-o-g-n-a."  When I do find it, the price per pound makes me look over to the choice beef tenderloin as a cheaper option...  Luckily, like most fine foods Pancetta is surprisingly simple (and fun) to make at home.  Not only will you have a better finished product, you'll save a lot of money.


  • 7-10 pound pork belly 
  • 2 tablspoons of granulated garlic 
  • 3 teaspoons of InstaCure #1
  • 1/4 cup Kosher salt
  • tablespoons dark brown sugar
  • tablespoons black peppercorns
  • 2 tablespoons juniper berries
  • bay leaves
  • 1.5 teaspoon freshly grated nutmeg
  • 2 tablespoon for dried thyme

  • Put these ingredients into a food processor (don't put the pork belly in) and pulse until peppercorns and juniper berries are coarsely ground.  If the pork belly has skin, trim it off first, then rub the cure mixture evenly over both sides.  I find it easier to sprinkle half of it evenly across the surface of one side, then rub it into every area, flip and repeat.  Make sure to cover every surface, including the sides.


    If you can find a plastic ziptop bag that's big enough to hold the pork belly flat, use that to contain it.  I use plastic wrap I carefully overlap to hold in as much of the juices as possible.  It doesn't have to be airtight, but the tighter you can get it, the better.

    Lay the pancetta on a paper towel lined baking sheet (or serving tray or cake pan) that's large enough for it to lay flat.  Put another tray or cutting board on top of it with about three pounds of weight to provide compression.  Place this in the refrigerator for seven days.  Flip the pork belly once per day to redistribute the cure.  As the cure draws moisture out, juices will accumulate around it.  Make sure your baking sheet or cake pan is large enough to contain it or you will have a mess to clean up in your refrigerator.

    After 7 days check to see if the pancetta is firm throughout.  If it's not, give it a few more days, continuing to flip it over each day.  Once it's firm, take it out of the plastic and thoroughly rinse the cure, spices, and herbs off with cold water.  Use paper towels to dry all the moisture off.  After it's completely dry, take another tablespoon of coarsely ground black pepper and sprinkle it over one side.


    Your last step before drying is to roll the pancetta as tightly as you can (pepper side in).  Do your best to avoid having any air pockets in the roll.  Use cotton twine to tie it in position...I prefer to use a half hitch every 1-2 inches, but any knot you like will suffice as long as it keeps the roll tight.  Make your knots uniform for an artisanal look.  Before you tie off the ends, cut the pancetta so it's flush, tight, and even on the ends.  Leave enough twine on each end so you can hang it to dry.  


    In a cool dark humid place (probably your basement) hang your pancetta for two weeks or until the weight has dropped by 20%.  Ideal conditions would be 50-60 degrees Fahrenheit with humidity 50-65%.  A little air flow is good, but it shouldn't be in front of a fan.  If you're like me and don't have a basement, investigate all possibilities where you can find the right conditions.  If you can't get conditions close to this, place it in the bottom vegetable drawer of your refrigerator.  The process will take longer there, but the results will be very similar.  


    Pancetta doesn't have to be aged/dried, but the process concentrates the flavors and I believe ends in a much better product.  I no longer put cheesecloth on my pacetta as it tends to stick when it's time to remove it.

    After a couple weeks, your pancetta should be  ready.  You can enjoy it in many different ways.  It should keep in the refrigerator for a month and in the freezer for at least six months.  


     This version of pancetta should be cooked before you eat it.  There is a way to cure pancetta so it can be enjoyed as charcuterie, but that's another post...

    Superior pancetta for 1/10th of the price you would pay at the grocery store.  Bon appetit!

    Monday, December 14, 2015

    Brining 4 Fine Dining


    A bird in the brine is worth two in the bush...or maybe three or four if you ask me.  No other step in preparation will make such an impact on poultry and pork as time in a saltwater bath.  It changes everything!  Once you start doing it, you'll never want to eat chicken any other way.

    Brining will change your culinary life.  It makes every recipe better.  Not only does it make food taste better, it also makes it more forgiving to one of the worst enemies of good foods: overcooking.  By denaturing the proteins through brining, it won't dry out as fast.  So extra time in the oven, pan, or on the grill won't leave you with something only the dog is happy with.

    To brine successfully, you only need a mixture of salt and water.  There's nothing wrong with keeping it simple, but if you want to bring more flavor to the preparation, the brine offers an excellent opportunity to do it.  Herbs, spices, spirits, and broths can all be added to the salty solution to provide layers of flavor in the finished dish.  A word of caution about acidic additions to a brine.  In my experience acidic brines can cause a ceviche effect...not what I'm looking for in my chicken.

    Start simple and customize to please your individual palate.  My 24 brine:

    • 24 parts water
    • 1 part salt
    • 24 hours
    • Optional additions: A teaspoon of fresh ground black pepper and/or dried garlic.  A tablespoon or two or three of dried (or fresh) thyme, onions, oregano, rosemary, or allspice.
    • Enough volume to submerge your chicken, turkey, or pork
    • Stir every 12 hours

    I often use this for chicken, but it works just as well for pork tenderloin and chops.  A small/regular sized chicken breast needs at least 6 hours in the brine.  Thighs and legs need more time.  If you have a larger chicken or a big pork roast, extend the brine time beyond 24 hours.  Turkeys need at least 48 hours in a brine.  Free range chickens are tough (but delicious) and need a little more than 24 hours in the brine.  As a general rule, you will not be disappointed with 24 hours of brining regardless of what you're cooking.

    Brining is not part of any recipe.  It's a simple preparation for all recipes you want to make.  Use the brine and you will have a much better finished product.  If you do it every time, you'll have better results every time.  Do it a few times and you'll learn you need to do it every time.

    To Those Who Want To Do More


    The Lofty Kitchen is all about making great, ambitious foods (and wines) within the limitations of an urban kitchen.  We all love confit, champagne, fabulous desserts, and charcuterie, but not everyone has the budget  to enjoy the fine things in life on a regular basis.  Listen to the artisans and they will have you believe you should buy from them because cassoulet, sushi, and 
    pâtés are beyond the abilities of those who haven't spent years in culinary school...

    I have been fortunate to enjoy the works of many great culinary artists.  Many of them have shared their experience with me and that knowledge has enhanced my experience at home.  They feel no threat from an ambitious amatuer like me who admires their work and tries to replicate it.  Admire away, but still I ask myself; why would I pay $30 for something I can do myself for $2?

    One thing I've learned is great food doesn't happen without preparation.  Notice I didn't say work...preparation is the key.  If you want a great chicken dinner, you have to start it two days in advance.  Plan ahead and you will make foods much better than a fine restaurant where the cost of dinner for two often reachs three figures.

    In the years ahead I hope to share my experiences (both good and bad) while encouraging you to do great things in your kitchen.  Exceptional foods are within your reach and budget.